Introduction
Runway markings are the white painted lines, numbers, and symbols on the pavement that tell you where to land, where to aim, and how much runway you have left. They are standardized around the world, so once you learn them you can apply that knowledge at almost any airport. These markings work together with signs and lights to create a clear, visual “language” for safe takeoff and landing.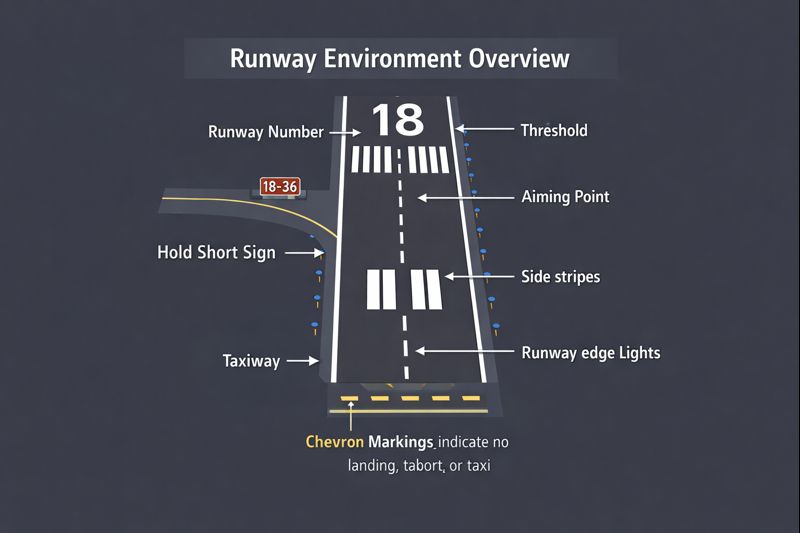
How to read runway numbers
Runway numbers are based on the runway’s magnetic heading, rounded to the nearest 10 degrees and shortened to two digits. For example, a runway aligned with heading 184 degrees is marked as “18,” and the opposite direction, around 004 degrees, is marked as “36.” At airports with parallel runways, letters like L, C, and R (Left, Center, Right) are added so you can quickly identify the correct strip of pavement.
Core runway markings student pilots must know
As a student pilot, focus first on these key markings you will use on every flight lesson:

- UNPARALLELED COMFORT: The Bose A30 is a full-sized circumaural aviation headset with a lightweight design and 20% lower …
- PRECISION-FOCUSED NOISE CANCELLING MICROPHONE: The Bose A30’s microphone is engineered for aircraft with “hot mic” or PT…
- FAA TSO and EASA E/TSO-C139a CERTIFIED: The Bose A30’s robust design has passed 145 tests by the Bose engineering and qu…
As an Amazon Associate, AviatorFinds earns from qualifying purchases.
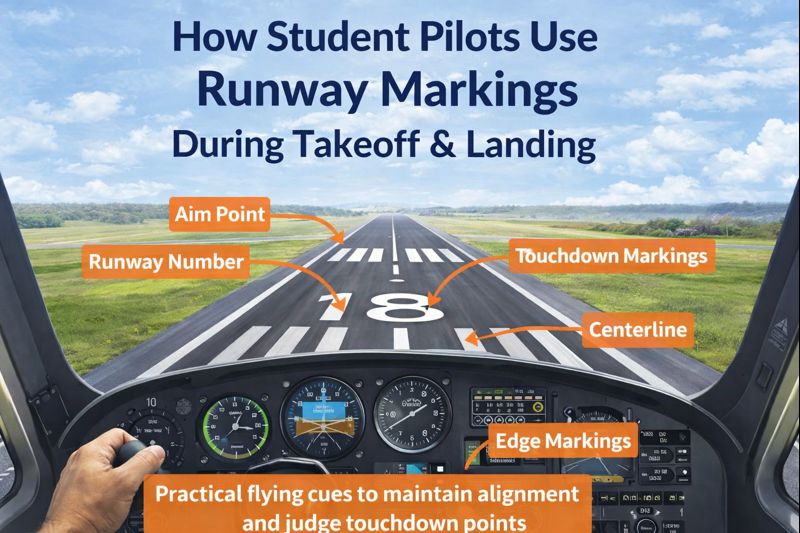
- Centerline: A dashed white line down the middle of the runway that helps you stay aligned during takeoff and landing rolls.
- Threshold markings: White “piano key” bars at the beginning of the landing portion of the runway showing where usable landing pavement starts.
- Aiming point blocks: Two thick white rectangles, usually about 1,000 feet from the threshold, that show where you should aim to touch down on most standard approaches.
- Touchdown zone markings: Additional rectangular bars in pairs along the centerline indicating distance from the threshold and helping you judge where you are landing.
👉For a deeper look at every runway marking you’ll encounter during training, read our runway markings explained for student pilots guide.
Learning to land on a runway
When learning to land on a runway, think of the aiming point as your visual anchor and the centerline as your “rail.” On final approach, keep the aiming point fixed in the windshield while adjusting pitch and power to control glide path and airspeed. As you transition to the flare, shift your focus down the runway, keep the nose aligned with the centerline, and let the aircraft settle close to the aiming point without drifting left or right.
Takeoff and landing runway procedures
Standard procedures make every takeoff and landing more predictable and safer. Before takeoff, students should:
- Brief the runway in use, including number, length, wind direction, and any obstacles.
- Line up on the centerline, verify heading matches the runway number, and smoothly apply power while tracking the centerline with rudder.
On landing, use a stabilized approach: correct airspeed, proper flap setting, and a steady descent path to the aiming point. After touchdown, maintain directional control on the centerline, gradually reduce back pressure, and use brakes and aerodynamic braking as trained before exiting at a safe taxiway.
👉For a step-by-step breakdown of how pilots use aiming points, centerlines, and touchdown zone markings during real approaches, see our detailed guide on using runway markings in flight training.
Runway signs explained for pilots
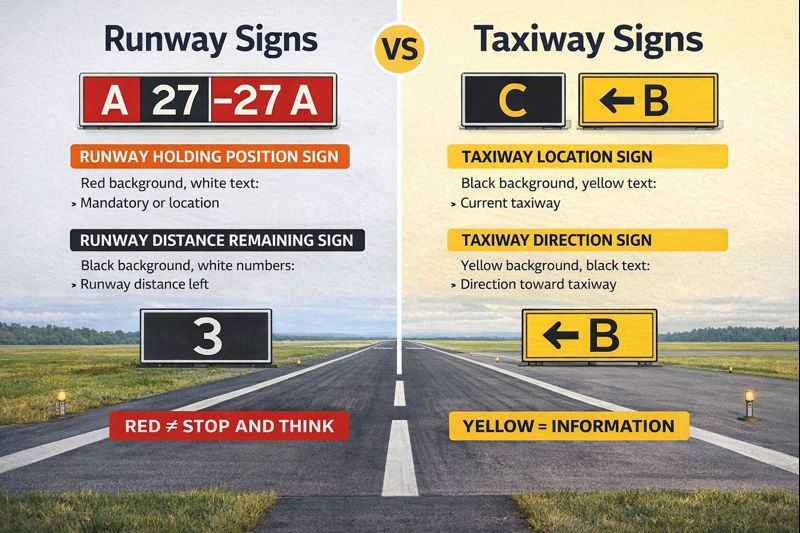
Runway and taxiway signs use a consistent color and shape code that quickly tells you where you are and where you must stop:
- Mandatory instruction signs: Red background with white text (for example, “18-36” or “RWY 18-36”) indicating a runway holding position where you must have clearance to cross or enter.
- Runway location signs: Black background with yellow numbers showing the runway you are currently on.
- Direction and taxiway signs: Yellow background with black letters and arrows showing taxiway identifiers and the direction to turn to reach them.
Runway lighting explained for beginners
Runway lights help you identify the runway, its edges, and its end during night or low-visibility operations. Edge lights are typically white along the length of the runway, changing to yellow near the end to warn you of remaining distance on some runways. At the very end of the runway you will often see red lights (runway end identifier lights or stop-end lights), while green lights at the threshold mark the beginning of the landing portion of the runway from the approach side.
👉Runway markings are only part of the visual picture. At many airports — especially at night or in low visibility — signs and lighting play an equally important role in situational awareness.
Helpful comparison of runway cues
| Feature | What it looks like | What it tells student pilots |
|---|---|---|
| Runway numbers | Large white 2-digit numbers, sometimes with L/C/R | Magnetic direction of the runway and which side to use |
| Centerline | Dashed white line down the middle | Where to align for takeoff and landing rolls |
| Threshold “piano keys” | Parallel white bars at runway start | Beginning of landing area and an indication of runway width |
| Aiming point blocks | Two thick white rectangles near 1,000 ft in | Ideal touchdown area on most visual and instrument approaches |
| Touchdown zone markings | White rectangular bars in pairs along centerline | Distance from threshold and refined touchdown reference |
| Edge lights | White (often turning yellow near runway end) | Lateral limits of runway at night or in reduced visibility |
| End/threshold lights | Red at end, green at approach threshold | Exact start and end of usable runway for landing and takeoff |
| Mandatory runway signs | Red background with white text | Points where clearance is required to enter or cross runway |
Common runway mistakes student pilots make
Being aware of common runway mistakes can help you avoid them from the start. Frequent issues include drifting off the centerline during the takeoff roll or landing rollout because of improper rudder use or not looking far enough down the runway. Students also sometimes misread runway or taxiway signs, leading to wrong turns or runway incursions, and may aim short of or far beyond the aiming point, which reduces safety margins on shorter runways.
Practical tips to build runway confidence
A few simple habits make a big difference in runway confidence and safety as a new pilot. Chair-fly each takeoff and landing, verbally walking through what each marking and light means on the airport diagram before you fly. In the airplane, say what you see out loud—runway number, centerline, threshold, and aiming point—so that reading runway markings, signs, and lights quickly becomes automatic.