Introduction
Runway Markings Explained for Student Pilots (With Examples)
Runway markings are one of the first “languages” student pilots learn to read at an airport. While they may look like simple white paint on pavement, each marking carries critical information about where to land, where to aim, and where not to go. Understanding runway markings early will improve your situational awareness, reduce workload, and help you fly safer approaches and takeoffs.
If you’re new to flight training, this guide breaks down every major runway marking you’ll encounter in plain language, with practical context for real-world flying.
As an Amazon Associate, AviatorFinds earns from qualifying purchases.
If you’re looking for a broader overview that includes runway signs, lighting, and procedures, see our complete guide to runway markings for student pilots.

👉For a complete overview of runway markings, runway signs, lighting, and takeoff and landing procedures, see our Runway Markings, Signs & Lighting: A Student Pilot Overview.
What are runway markings?
Runway markings are standardized white markings painted on runways to provide visual guidance during takeoff, landing, and rollout. They indicate alignment, usable runway length, touchdown zones, and areas that are unsafe for landing.
These markings are standardized internationally, meaning the same basic markings apply whether you’re flying from a small training airport or a major international field.
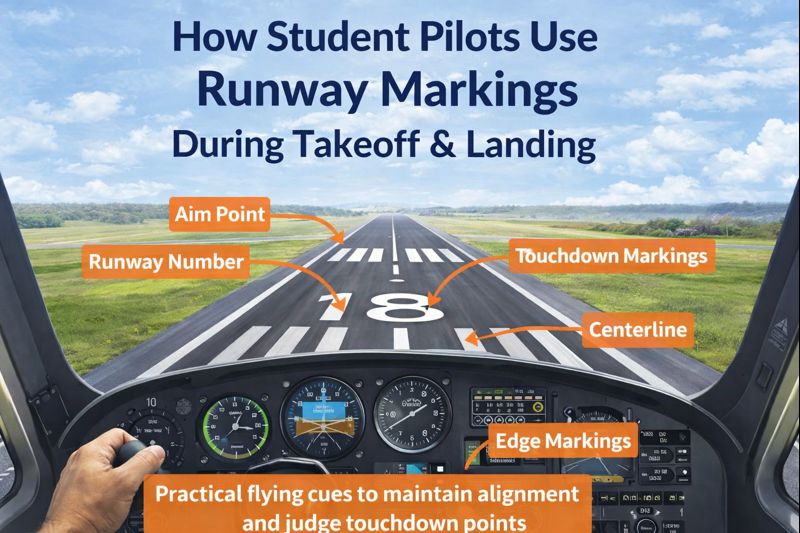
Runway centerline
The runway centerline is a dashed white line running down the middle of the runway.
What it tells you
- Where to align the aircraft during takeoff and landing
- Helps maintain directional control during rollout
- Critical reference in crosswind conditions
Student pilot tip
During takeoff and landing, avoid fixating on the nose. Look far down the runway and use rudder inputs to keep the centerline visually straight beneath you.
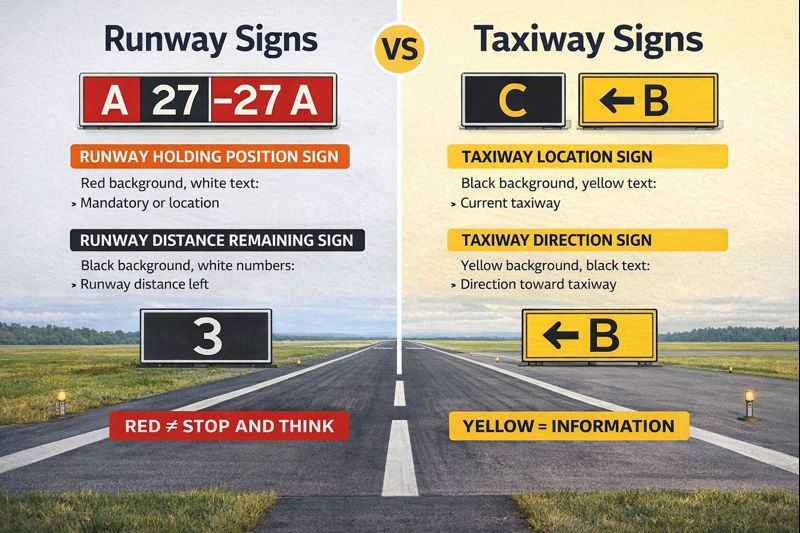
Runway threshold markings (“piano keys”)
Threshold markings are the white rectangular bars located at the beginning of the landing portion of the runway.
What they tell you
- The start of the usable landing area
- Provide a visual cue for runway width
Important distinction
- Displaced threshold: You may taxi, take off, or roll out past it, but you should not land before it.
- Normal threshold: Full runway available for landing.
Displaced threshold markings
A displaced threshold is marked with arrows leading up to a new threshold location.
What it tells you
- Landing before the threshold is unsafe
- Often displaced due to obstacles, pavement strength, or noise considerations
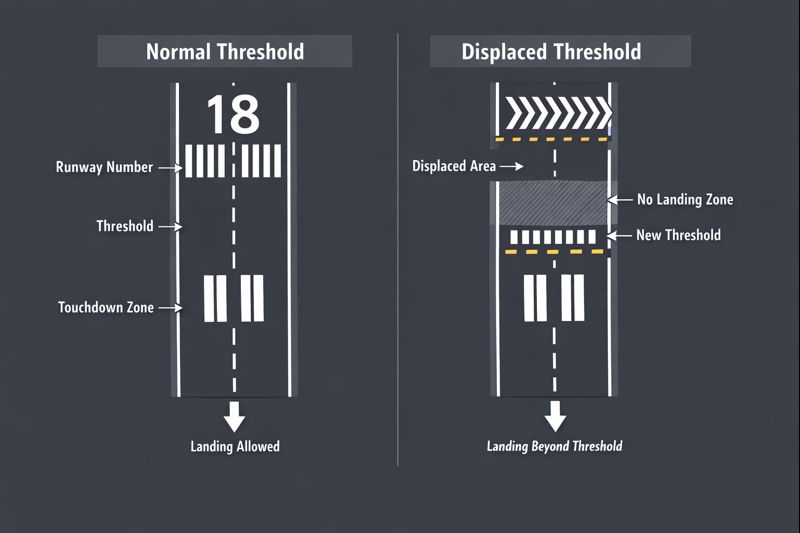
Student pilot mistake to avoid
Landing before the displaced threshold reduces obstacle clearance and violates published runway limitations.
👉 If you’re unsure how displaced thresholds differ from standard thresholds, we explain them in detail in our runway markings visual guide.
Aiming point blocks
Aiming point markings are two large white rectangular blocks, typically located about 1,000 feet from the threshold on precision runways.
What they tell you
- Where to aim on final approach
- Helps establish a stabilized approach path

Important note
Your aiming point is not your touchdown point. In most training aircraft, touchdown occurs slightly beyond the blocks.
Touchdown zone markings
Touchdown zone markings are pairs of white rectangular bars placed symmetrically about the centerline after the aiming point.
What they tell you
- Distance remaining from the threshold
- Helps judge where you are landing relative to runway length
These markings are especially helpful on longer runways and during instrument approaches.
Side stripes
Side stripes are solid white lines along the edges of the runway.
What they tell you
- The lateral boundaries of the runway
- Particularly important on wide runways or in low visibility
They help prevent runway excursions during rollout and rejected takeoffs.
Chevron markings
Chevron markings indicate pavement that is not usable for landing, takeoff, or taxi.
What they tell you
- This area is unsafe
- Often found near runway ends or blast pads
Never land, take off, or taxi on chevrons.
Closed runway markings
A closed runway is marked with large white “X” symbols.
What they tell you
- The runway is unavailable for operations
- Can be temporary or permanent
A runway marked with Xs should never be used, even if it appears physically clear.
How runway markings work together
Runway markings are designed to be read as a system:
- The centerline keeps you aligned
- The threshold defines where landing begins
- The aiming point guides approach geometry
- The touchdown zone helps manage landing distance
- Side stripes and chevrons define safe limits
As a student pilot, learning to interpret these markings together — not individually — builds confidence and consistency.
Common student pilot mistakes with runway markings
- Aiming at the threshold instead of the aiming point
- Drifting off the centerline during rollout
- Confusing displaced thresholds with normal thresholds
- Ignoring chevrons near runway ends
Awareness of these mistakes early in training helps prevent runway overruns and incursions.
How this connects to other runway knowledge
Runway markings are just one part of the runway environment. To fully understand runway operations, student pilots should also learn:
- How runway numbers relate to magnetic headings
- How runway signs prevent runway incursions
- How runway lighting supports night and low-visibility operations
👉 For a complete overview of runway markings, runway signs, lighting, and takeoff and landing procedures, see our Runway Markings, Signs & Lighting: A Student Pilot Overview.