✈️ The Aircraft That Trains the World
If you ask any pilot where they took their first flight lesson, the answer is almost always the same — “a Cessna 172.”
Since 1956, this four-seat trainer has introduced generations of aviators to the sky. The 172’s stability, forgiving handling, and unmatched visibility make it the ideal aircraft for learning to fly. Whether you’re chasing a private pilot license (PPL) or simply exploring a lifelong dream, the Skyhawk is your ticket to the cockpit.
🧭 What Makes the Cessna 172 Perfect for Training
1. Forgiving Flight Characteristics
The Skyhawk is incredibly stable in flight. Its high-wing design offers natural lift and visibility, and its stall behavior is gentle and predictable — exactly what a nervous new pilot needs.

- FIVE STAR COMFORT: Embark for every journey sporting maximum comfort. Our over the ear headphones are constructed for a …
- FIVE BY FIVE COMMS: We understand reliable communication is key for safety. Our noise canceling headset with a microphon…
- EXCEPTIONAL QUALITY: Invest in your future. Aviation headsets for pilots are essential aviation tools that should be bui…
As an Amazon Associate, AviatorFinds earns from qualifying purchases.
2. Simple Systems
Everything about the 172 is designed to teach good habits without overwhelming complexity.
- Manual flaps, reliable fuel system, straightforward engine management.
- Modern models include the Garmin G1000 NXi, giving students early glass-cockpit experience.
📎 Related reading: Garmin G1000 Avionics Guide →
3. Affordable and Available Everywhere
Almost every flight school has a fleet of Skyhawks. They’re efficient, inexpensive to maintain, and familiar to instructors worldwide.
💬 Fun fact: Some Cessna 172s in flight schools have logged more than 15,000 hours of flight time and are still going strong.
🛠️ Step 1: The Pre-Flight Walkaround
Before every lesson, you’ll perform a pre-flight inspection — a ritual that becomes second nature.
You’ll check:
- Fuel quantity and quality (sumping the tanks).
- Oil level and engine condition.
- Flaps, ailerons, and rudder for smooth movement.
- Tire pressure, fuel caps, and safety pins.
It’s your first taste of pilot responsibility — learning that safety begins before you ever touch the throttle.
🛩️ Step 2: Taxi, Takeoff, and Climb
Taxiing a tricycle-gear 172 is straightforward. You’ll use your feet (rudder pedals) to steer, keeping your hand on the throttle for smooth power control.
Once lined up on the runway, it’s full power — the Lycoming engine roars, the airspeed indicator climbs, and at around 55 knots, you gently pull back.
Just like that, you’re flying.
Typical Training Takeoff Specs:
- Rotate speed: 55 knots
- Climb speed: 74 knots (Vy)
- Initial climb: ~700–800 ft/min
From here, your instructor will guide you through coordinated turns, climbs, and descents — learning how the airplane feels in your hands.
🧩 Step 3: Understanding the Cockpit
Even in older 172s, the cockpit layout is intuitive.
You’ll start with six basic instruments — the classic “six-pack.”Instrument Purpose Airspeed Indicator Shows how fast you’re moving through the air Attitude Indicator Horizon reference for pitch and bank Altimeter Measures altitude Turn Coordinator Helps keep turns coordinated Heading Indicator Displays aircraft heading Vertical Speed Indicator Shows rate of climb or descent
Modern versions replace these with digital screens — the G1000 glass cockpit — showing everything in one glance.
📎 Related: Aircraft Radios Explained: How Pilots Talk to Air Traffic Control →
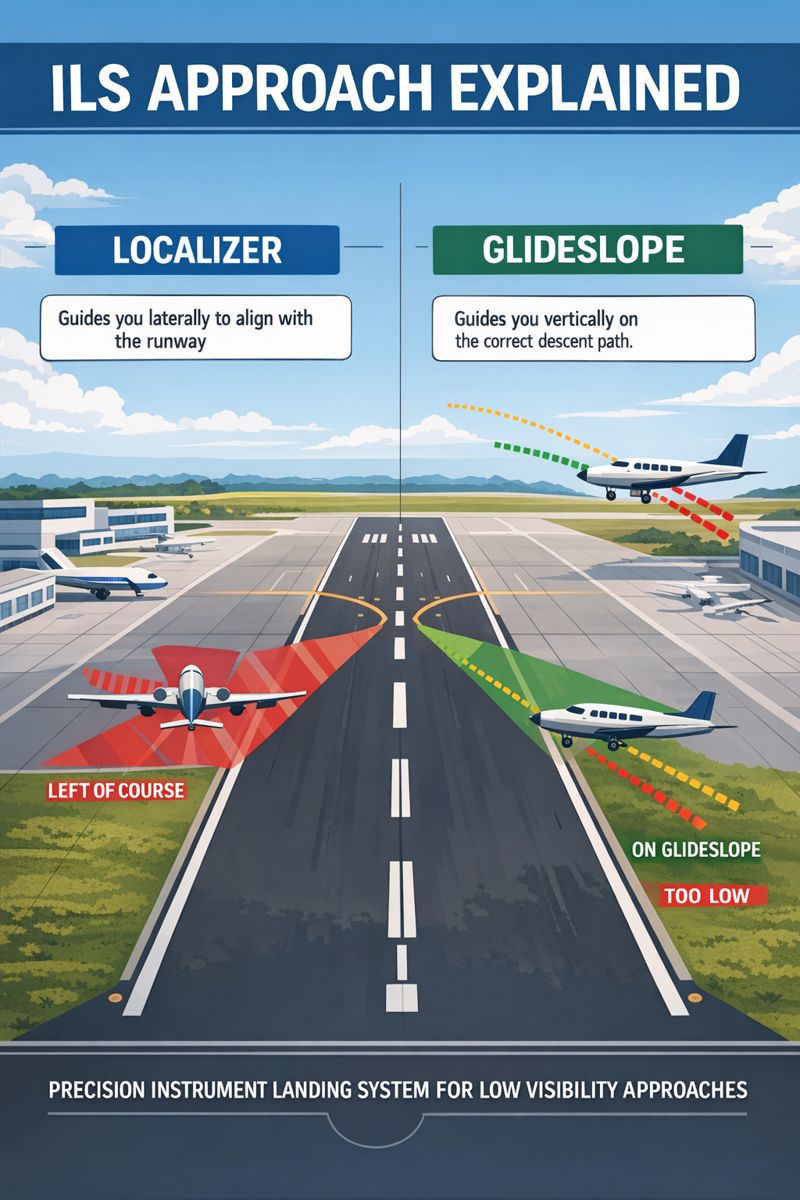
🌤️ Step 4: Learning Weather and Airspace
Every lesson involves weather and navigation.
You’ll learn how to:
- Read METARs and TAFs (aviation weather reports).
- Interpret cloud types, visibility, and crosswind limits.
- Navigate controlled and uncontrolled airspace — using both VFR charts and GPS.
The 172’s stable platform makes it the ideal “flying classroom” for practicing weather judgment and visual navigation.
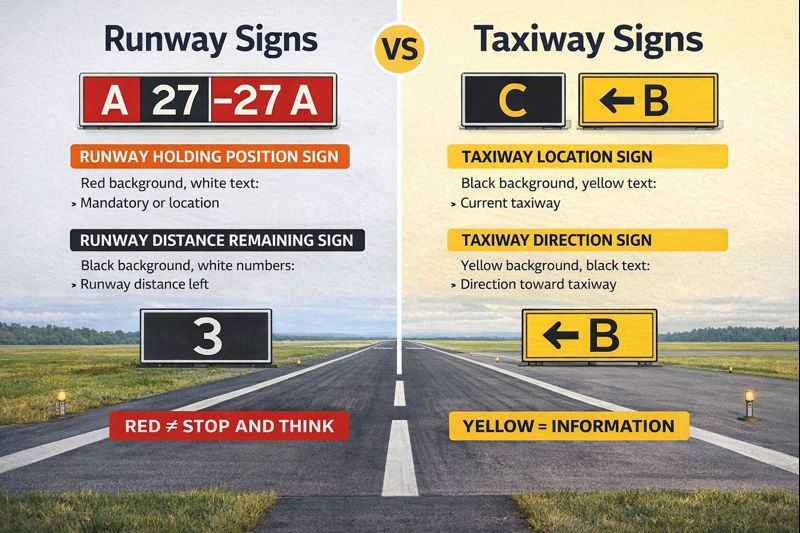
🧭 Step 5: Radio Communication and Situational Awareness
One of the most intimidating parts of early training is talking to ATC — but the 172 makes it simple.
With built-in dual COM radios and clear cockpit acoustics, students quickly gain confidence.
You’ll learn standard phraseology like:
“Tower, Cessna G-ABCD, holding short runway two-six, ready for departure.”
Before long, those radio calls will feel as natural as driving directions.
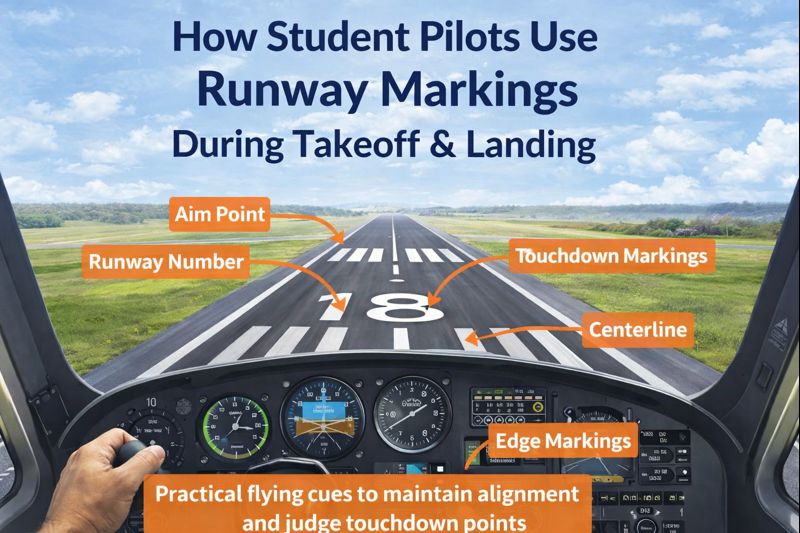
🛬 Step 6: Landing Practice and the First Solo
Landing a Skyhawk is both art and science.
You’ll practice power-off approaches, flares, and go-arounds until muscle memory takes over.
- Final approach speed: 65 knots
- Flare height: around 10 feet
- Touchdown: main wheels first, then nose gently lowers
After about 10–15 hours, most students are ready for the milestone every pilot remembers — the first solo flight.
💬 That moment when your instructor climbs out and says, “Take her around the pattern” — unforgettable.
🎓 Step 7: From Student to Pilot
Earning your Private Pilot Licence (PPL) in a Cessna 172 typically takes:
- 45–60 flight hours (UK) or 40+ (US minimum)
- 5–10 written exams (air law, navigation, meteorology, etc.)
- A skills test with an examiner
When you pass, that little blue or white aircraft will always feel like home — your first true set of wings.
🔧 Thinking Ahead: From Student to Owner
Many students go on to buy or co-own a Cessna 172 after training.
With countless models and upgrades, you can tailor your Skyhawk to your flying style:
These paths keep the learning going long after you’ve earned your license.
💬 Final Thoughts
Learning to fly in a Cessna 172 is more than a checklist of lessons — it’s an experience that shapes every pilot’s journey.
From your first takeoff to the thrill of flying solo, the Skyhawk is both a classroom and a companion, forgiving when you’re nervous, and precise when you’re ready to master the skies.
Whether your dream is to earn your wings or simply understand how pilots do what they do — the Cessna 172 will always be where that dream begins.
📎 Related Articles
🛫 Cessna 172 Skyhawk — The Complete History and Pilot’s Guide